参考:GitHub Pages + Hexo搭建个人博客网站,史上最全教程
搭建
创建github仓库
新建public仓库,命名为<用户名>.github.io
仓库settings中pages项启用github pages(默认是启用了的)
本地hexo
- 安装
Hexo
npm install -g hexo-cli
验证是否安装成功:查看版本
hexo -v
- 创建一个项目
hexo-blog
hexo init hexo-blog # 将在当前目录下创建一个名为hexo-blog的目录,这个目录后面称作<博客目录>
- 更换主题:以volantis主题为例
在<博客目录>下:
下载主题源码,以后就可以魔改了
git clone https://github.com/volantis-x/hexo-theme-volantis.git themes/volantis
修改<博客目录>目录下的_config.yml:
theme: volantis
关联github仓库
配置好后,执行hexo g -d可以直接发布到github:
- 安装hexo-deployer-git
npm install hexo-deployer-git --save
- 修改根目录下的
_config.yml,配置 GitHub 相关信息
deploy:
  type: git
  repo: https://github.com/yaorongke/yaorongke.github.io.git
  branch: main
  token: ghp_3KakcaPHerunNRyMerofcFd9pblU282FSbsY
其中 token 为 GitHub 的 Personal access tokens
(settings - developer settings- Personal access tokens)
[可选]volantis主题优化
参考:Volantis
volantis主题提供非常友好的配置方式:将<博客目录>/themes/volantis/_config.yml复制到<博客目录>下,命名为_config.volantis.yml,然后对这个yml文件进行配置即可(此配置文件的优先级高于_config.yml)
搜索
标题和内容搜索简直是支持成为好用博客的最重要因素了!
这里以使用hexo search为例
- enable:
在<博客目录>下运行下述,安装支持:
npm i hexo-generator-json-content
配置_config.volantis.yml:
search:
  enable: true
  service: hexo  # hexo, algolia, meilisearch
- 其他配置:修改
_config.volantis.yml中的search下面的配置即可
暗黑模式
在顶部导航栏新增dark/light mode切换按钮:
_config.volantis.yml:
navbar:
    ...
    menu:
    ...
        - name: 暗黑模式
          icon: fa-solid fa-moon
          toggle: darkmode
文章分类和标签
页面
- 分类页面
Create file if not exists: source/categories/index.md
---
layout: category
index: true
title: 所有分类
---
- 标签页面
Create file if not exists: source/tags/index.md
---
layout: tag
index: true
title: 所有标签
---
文章给分类和标签
给文章写了分类和标签之后会自动在首页、分类页面、标签页面形成对应内容
- 分类
多级分类:分类B是分类A的子类
---
categories: [分类A, 分类B]
---
并列分类:分类A和B是并列分类
---
categories:
  - [分类A]
  - [分类B]
---
多级+并列分类
---
categories:
  - [分类A, 分类B]
  - [分类C, 分类D]
---
- 标签
---
tags:
  - tag1
  - tag2
---
其他页面
见页面配置 - Volantis,比如“关于页面”、“友链页面”等
评论
以giscus为例
_config.volantis.yml:
comments:
  ...
  service: giscus
  ...

  giscus:
    # 以下配置按照 yml 格式增删填写即可
    # repo: xxx/xxx
    # repo-id: xxx
    # category: xxx
    # category-id: xxx
    # mapping: "pathname"
    # reactions-enabled: "1"
    # emit-metadata: "0"
    # lang: "zh-CN"
    # 以上配置按照 yml 格式增删填写即可
上述comments/giscus下方的配置填啥:
- 进入giscus,按
Repository这里说的配置你的github仓库(每一步不会的就戳蓝色链接进去,有手把手步骤)
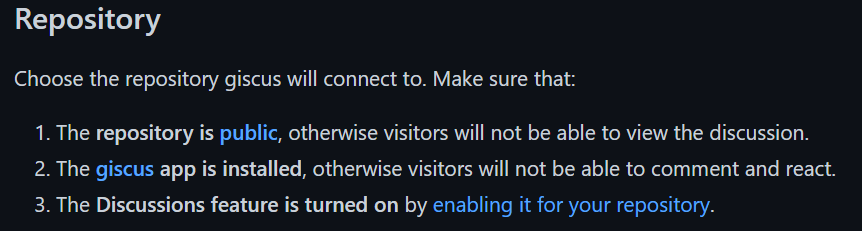
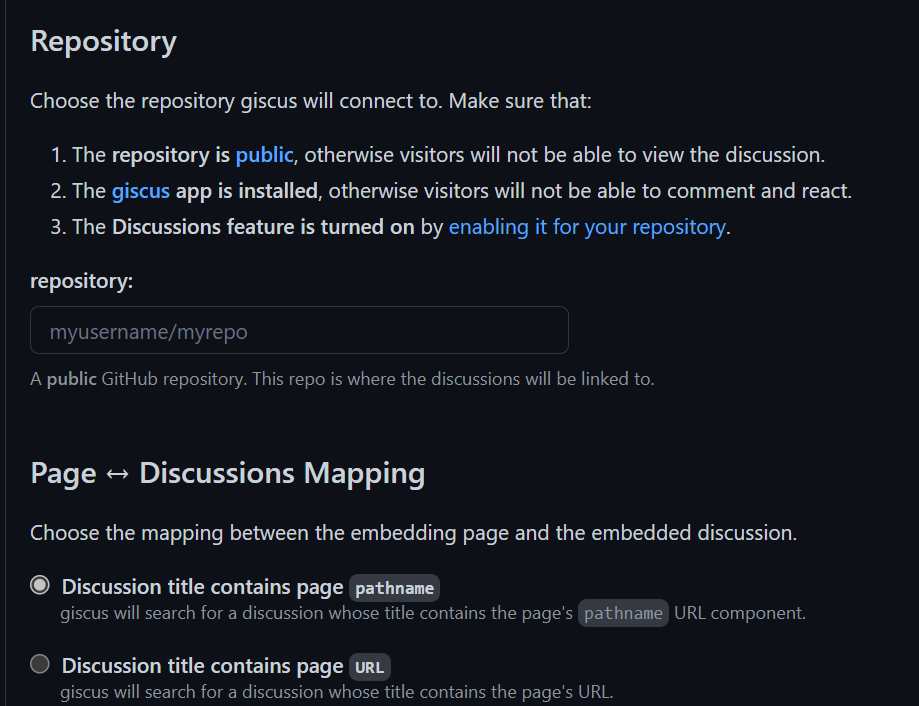
- 配置github仓库完成后,回到giscus,从
Repository开始填写你的信息:主要填一下你的Repository,接下来的通常用默认勾选的就可以
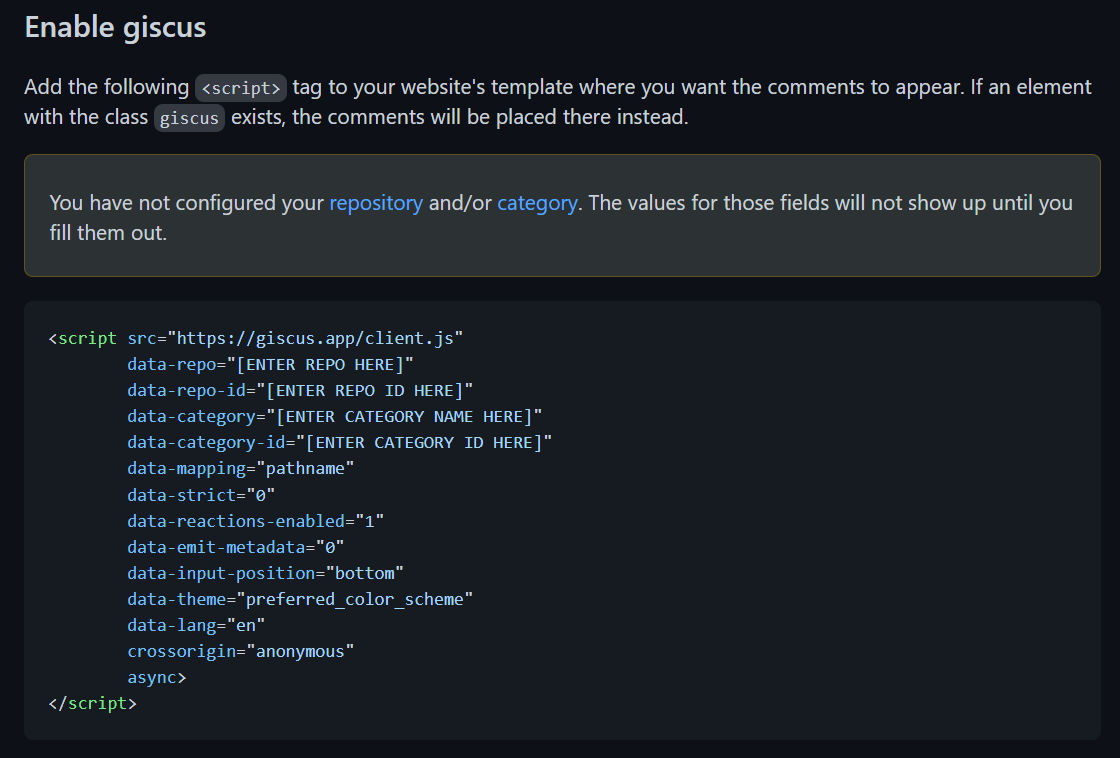
- 然后下方
Enable giscus处就会出现给你的配置信息,对着填即可
引用自己上传的素材等
指的是在yml文件中引用(文章中引用的格式见下文)
上传到source目录下,然后在yml文件中可以用/路径来引用
比如引用图片source/img/test.jpg是用/img/test.jpg
侧边栏配置
https://volantis.js.org/v5/theme-settings/#%E4%BE%A7%E8%BE%B9%E6%A0%8F%E9%85%8D%E7%BD%AE
搭建后维护
写文章
[可选]引用图片
- 配置:修改<博客目录>目录下的
_config.yml:打开这个配置是为了在生成文章的时候生成一个同名的资源目录用于存放图片文件等
post_asset_folder: true
- 语法:在文章中引用这个目录中的图片的方式:(举例:cute.jpg在这个同名目录下)(用markdown语法引用图片
![]()有时会失效,推荐下述)
{% asset_img cute.jpg cute_sirotan %}
{% asset_img cute.jpg %}
引用网图:


新建文章
hexo new "<post_name>"
this will generate /source/_post folder
specify path --path,-p
bash hexo new "hello_title" --path writing/hello
this will create source/_posts/writing/hello.md file with the following front matter:
```markdown
title: hello_title
date: 2019-04-04 23:51:44
The `--path` option is not documented, but it is listed when using `hexo help new`.

#### 删除文章

来自[How do I delete a post in hexo - Stack Overflow](https://stackoverflow.com/questions/27894210/how-do-i-delete-a-post-in-hexo)

There is no command to delete a post on Hexo, but follow this steps :
1. Delete the post under `source/_post` folder
2. Run `hexo clean` to delete the database (`db.json`) and `assets` folder
3. Run `hexo generate`to generate the new blog without your deleted post
4. Run `hexo deploy` to deploy your blog

#### [给文章分类and加标签](# 文章给分类和标签)

#### 文章置顶

```markdown
---
pin: true
---
设置文章作者
Volantis 支持多个作者在一个站点发布文章,其他作者信息需要写在数据文件中,例如:blog/source/_data/author.yml
Jon:
  name: Jon Snow
  avatar: https://cn.bing.com/th?id=AMMS_fc8f99fd41ebd737a71c4e13806db9a0&w=110&h=110&c=7&rs=1&qlt=80&pcl=f9f9f9&cdv=1&dpr=2&pid=16.1
  url: https://gameofthrones.fandom.com/wiki/Jon_Snow
Dany:
  name: Daenerys Targaryen
  avatar: https://tse1-mm.cn.bing.net/th?id=OIP.Yax4wLzIFbcBVUa_RsKywQHaLH&w=80&h=80&c=8&rs=1&qlt=90&dpr=2&pid=3.1&rm=2
  url: https://gameofthrones.fandom.com/wiki/Daenerys_Targaryen
在文章中设置作者:
---
title: Jon Snow | Game of Thrones Wiki | Fandom
author: Jon
---
自定义文章模板
修改<博客顶层目录>/scaffolds/post.md即可
volantis主题支持的文章中的标签
https://castiele.gitee.io/2020/10/23/volantis-article/
写文章后发布到博客
在<博客目录>下:
- 每次内容更新之后:
g生成文件,-ddeploy,如果完成[关联github](# 关联github仓库)则执行这行还会推送到github上
hexo g -d
- 当github上反应不是很及时时,可以本地启动查看内容
hexo s
可以在http://localhost:4000访问
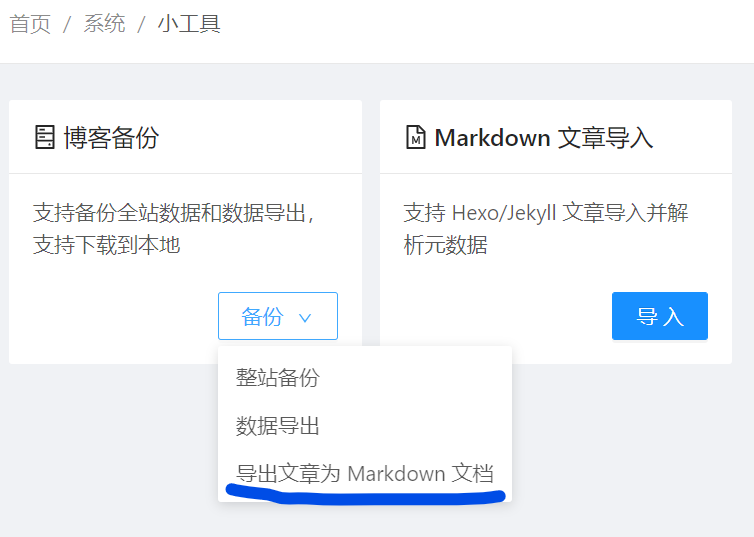
halo文章导入hexo
halo管理后台的系统-小工具
hexo高级
_posts目录下文章分级管理
以“按年月日”分级管理为例
效果:
_posts
└─2022
    └─12
        └─10
            ├─blog1
            ├─blog2
            ...
         ...
     ...
  ...
配置<博客目录>下的_config.yml:
new_post_name: :year/:month/:day/:title.md
这样hexo new <blog_name>就会自动创建目录(如果不存在的话)_posts/<year>/<month>/<day>/,并在该目录下生成<blog_name>.md和<blog_name>空目录
文章网页链接配置
default配置文章的网页链接会在文章标题前加上/<year>/<month>/<day>/,这是因为在_config.yml中设置了的缘故,如果希望网页链接没有日期前缀而只是文章标题,则可以配置_config.yml如下:
permalink: :name/